Apple watch radio

If you’re like me and you have the radio app not working and your Apple Watch is saying: “Sign in to your Apple ID in General in the Apple Watch app on your iPhone” (And of course you are signed in), this solved my issue.

  • Go to “Settings -> iTunes & App Store”
  • Tap on your logged in Apple ID.
  • Tap Sign Out button.
  • Reboot your phone (Just in case!)
  • Go back to “Settings -> iTunes & App Store”
  • Log back in with your Apple ID
  • Go to you Apple Watch and most probably you’ll see Radio working! Hurray!

Apple Watch Series 4 just in case. 😉

So you lost a disk on a MD RAID5 array, now what?

It happens, you just lost a disk on your RAID5 MD array, or things are not how it should look like… How do we troubleshoot this?

First things first, what’s the name of your MD device. You can easily learn that by issuing:

cat /proc/mdstat

This should output something similar to:

Personalities : [linear] [multipath] [raid0] [raid1] [raid6] [raid5] [raid4] [raid10]
md0 : active raid5 sdd[1] sda[3] sdb[2]
2929890816 blocks super 1.2 level 5, 512k chunk, algorithm 2 [3/4] [.AAA]
bitmap: 0/8 pages [0KB], 65536KB chunk

Here we have a MD device /dev/md0. (If you don’t see a response to this, you might have lost your MD device, which could be a bigger issue!)

Another thing that we see (Or we don’t see) here is that sda/sdb/sdd are here in the raid but sdc is nowhere to be found! This is our problem.

For some reason /dev/sdc is not in the RAID group anymore. Let’s see what’s going on with /dev/sdc?

mdadm --examine /dev/sdc

In my example this was hanging for a long time. When I issue dmesg on another console, I was getting a lot of I/O errors about this disk. This is telling me that the disk is malfunctioning.

I shutdown the server and wiggled the disk. Rebooted and it was back online. My array has now four disks however only 3 of them are “functioning” since after the reboot MD kicked /dev/sdc out of the array.

We need to reassemble the array and let RAID5 do its magic. First stop the MD device /dev/md0.

mdadm --stop /dev/md0

Then we need to add /dev/sdc back into the array:

mdadm /dev/md0 -a /dev/sdc

Then depending on the situation we might need to reassemble the array:

mdadm --assemble /dev/md0 /dev/sd[abcd] --verbose --force

Hopefully /dev/sdc is now back in your array now. This should start a long(er) process to sync up the array state to all disks and hopefully you now have your array back!

After the sync completes, I would still do a fsck on the /dev/md0 filesystem.

fsck.ext4 /dev/md0

e2fsck 1.45.5 (07-Jan-2020)
data: recovering journal
JBD2: Invalid checksum recovering block 185073680 in log
JBD2: Invalid checksum recovering block 89 in log
Journal checksum error found in data
data was not cleanly unmounted, check forced.
Pass 1: Checking inodes, blocks, and sizes
Pass 2: Checking directory structure
Pass 3: Checking directory connectivity
Pass 4: Checking reference counts
Pass 5: Checking group summary information
Free blocks count wrong (704006059, counted=696320594).
Fix? yes
Free inodes count wrong (182701042, counted=182694547).
Fix? yes

data: FILE SYSTEM WAS MODIFIED
data: 429421/183123968 files (0.2% non-contiguous), 36152110/732472704 blocks

You can use this same steps (or similar) to remove /dev/sdc and replace with a brand new hard drive. In my case wiggling solved the problem for now. (I probably will need a drive in the near future)

I hope this helped someone. It surely will help me when I will have to do this again 😛

Run pihole without raspberry pi

I have few 24/7 running linux boxes at home. I wanted to try pi-hole. But I really didn’t want to add another computer (raspberry pi) on my network.

So my initial feeling was why not try Docker? Good choice. Here is how easy it was.

Pull pihole docker image

docker pull pihole/pihole

Find your local IP (Replace eth0 with your ethernet identifier)

sudo ip addr show eth0 | grep "inet\b" | awk '{print $2}' | cut -d "/" -f 1
192.168.0.100

Get the IP (192.168.0.100 in my case) and run docker:

docker run -d --name pihole -e ServerIP=192.168.0.100 -e WEBPASSWORD="myawesomepassword" -e DNS1=8.8.8.8 -p 9080:80 -p 53:53/tcp -p 53:53/udp -p 9443:443 pihole/pihole:latest

Here in this example above I’m using myawesomepassword as login password to pihole (Change it to your password). I connect the host OS port 9080 to pihole’s port 80 and 9443 to pihole’s port 443.

DNS server is running on port 53. (Since I’m not doing any zone transfer I can leave TCP 53, but oh well ¯\_(ツ)_/¯ )

You can login to the admin interface in http://192.168.100:9080/admin and start setting your pihole up.

Have fun blocking pesky DNS requests 😉

shadowsocks auto deploy

I wrote a cloud-init script to automate the deployment of a shadowsocks server. I shared it in a gist here.

Features:

  • Creates a non-privileged user
    • Uploads your ssh public key to the user
    • Adds this user to the sudoers group
  • Disables ssh login for the root user
  • Downloads and installs libraries required for chacha20
  • Creates a “random” password and writes it in the config.json file
  • config.json file is in the /root directory. (You will need the password in this config file to be able to connect to your shadowsocks server.)
  • Starts the shadowsocks server.

You have to fill out the _YOURUSERNAMEHERE_, _YOURSSHPUBLICKEYHERE_ and _YOURFULLNAMEHERE_ with your data.

You can use this script in DigitalOcean easily following this document.

Air Quality Index Bot

After the devastating Northern California wildfires, I found myself looking at AirNow multiple times a day. Also at work, like many Bay Area tech companies, we use HipChat (or Slack). Naturally I was inclined to issue a slash command to get the latest air quality index (AQI) for my area in a chat channel. I couldn’t find a good AQI bot so I wrote one.

Installation for Heroku is on the README of the project. How to add a slash command for HipChat and/or Slack are not covered in this blog entry, but it’s very easy 🙂 (I used /aq <zipcode> for command)

The bot (really an API endpoint) is here in my github repo. Feel free to use, improve, contribute to it.

iCloud Photos, Meraki and Traffic Shaping

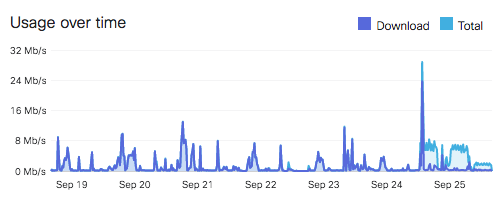
I turned iCloud Photo Library on this week. We have close to 250 GB of photos, videos in several different computers and mobile devices. You might have guessed it: it flooded our network since our outbound internet peaks around 6 Mbs (realistically). I needed to do something.

I have at home a Meraki MX65 and a MR42 (Thanks DaÄŸhan 😉 ) They give great visibility and control over our home network. I can easily pinpoint where the problem is and take actions. Here is a great chart that shows how the nature of our traffic changed on Sep 24 after turning iCloud Photo Library on. (See the light blue? That’s increased upload!)

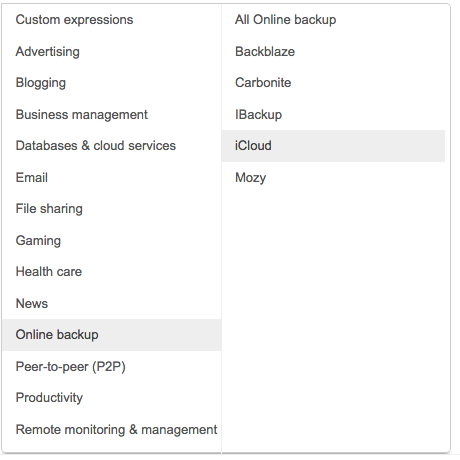
One of the easiest way to slow this traffic down is to shape it with Meraki Traffic Shaping rules. This document talks about in detail how to do this. However the iCloud settings in the canned traffic shaping rules is only related to backup and doesn’t work with iCloud Photo Library traffic.

Meraki allows you to do application layer or layer 3 traffic shaping. Since the traffic is encrypted, the application layer traffic shaping was not an option. For layer 3, I needed the IPs that the Photos app was talking to. Since Apple owns the entire 17.0.0.0/8, it’s always an option to craft your rule using the entire class A subnet. However that wouldn’t be “elegant” 🙂 So let’s do some tcpdump exercise.

iMac:~ user$ sudo tcpdump -i en1 -n -c 1000 ip and net 17.0.0.0/8 | grep '>'| cut -d '>' -f 2 | cut -d "." -f 1-4 | grep 17\. | sort | uniq -c 
tcpdump: verbose output suppressed, use -v or -vv for full protocol decode
listening on en1, link-type EN10MB (Ethernet), capture size 262144 bytes
1000 packets captured
2120 packets received by filter
0 packets dropped by kernel
 647  17.248.128.44

What this tells us is that we captured 1000 packets and looked for all the ones that has “17.” in it, and counted them. In total 647 packets were transmitted to 17.248.128.44. Also it’s on port 443 only.

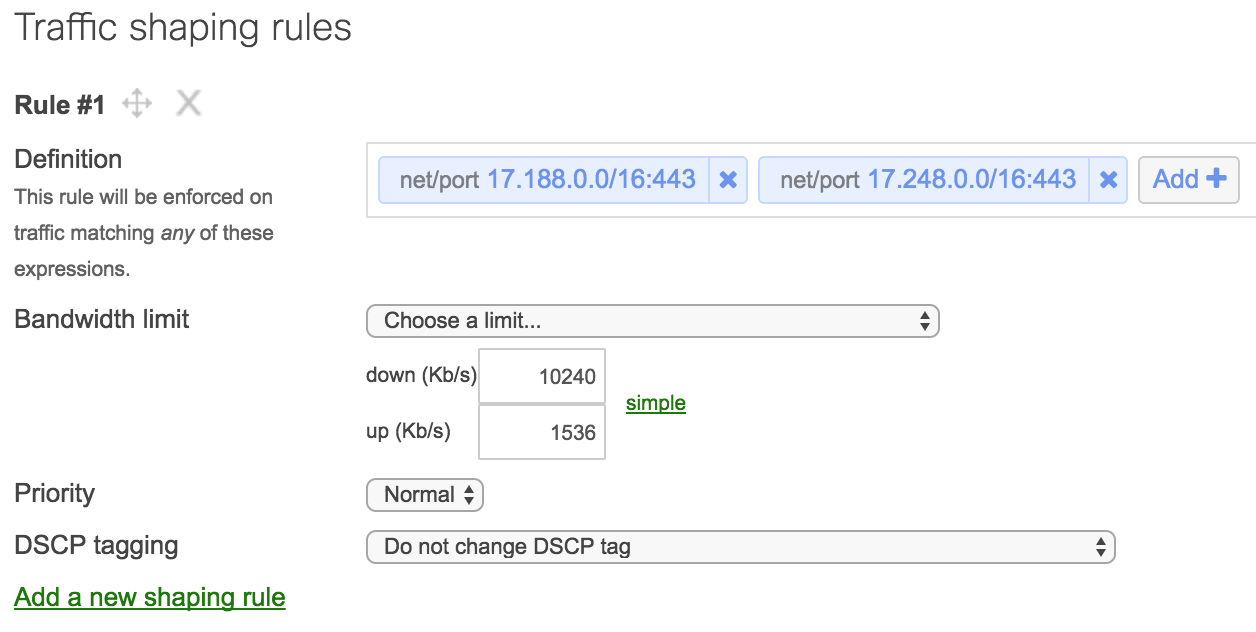
I did a similar packet dump for 10K packets. Which revealed that the sync between Photos app and iCloud is always happening on subnets: 17.248.0.0/16 and 17.188.0.0/16 on port 443. (There might be a more specific subnet, but this was enough for me to start with)

Let’s apply this to Meraki MX65 traffic shaping rules. In this rule below my upload limit per client is 1.5 Mbps. Depending on how many clients you have and your upload speed, you can come up with something more suitable for your network.

In order to figure out how to define these in Meraki, please follow the instructions in the previous doc that I linked.

Et Voilà! You got your home network back 😉

Yaesu FTM-400XDR and Chirp

I use Chirp. I love it. It’s the only way to program my Baofeng UV-R(+) radios… Period.

Also I love that I can download repeater settings according to a zip code, county, state, etc…

I wanted to use Chirp for my Yaesu FTM-400XDR. However it looks like Chirp doesn’t support this model. So my initial reaction was to create the repeater list with Chirp, export on CSV, and import it to Yaesu.

But, that wasn’t possible either since Yaesu expects the data in a different order and format.

I wrote a small python script that rearranges and reformats the CSV file to the expected import file for the Yaesu’s own software. Check out the README to read how you can install and use the script.

By the way, Yaesu’s software to program the radio doesn’t work on Mac OS X natively, since it’s a Windows software. I managed to run it on Mac OS X using wine. But that’s another blog entry…

No timer in Mac OS X? No problem!

Mac OS X doesn’t come with a timer installed by default. There are bunch of timers in the App Store, you can definitely install one of those.

But here is how to make one from scratch. Open terminal screen and type:

sleep 5 ; say "Time is up"

Well that’s it 🙂 This command will sleep for 5 seconds and say “Time is up” at the end of 5 seconds.

We can make a little script out of it and save as /usr/local/bin/timer as below:

#!/bin/bash
sleep $1 ; say "Time is up"

You can invoke the command like this, it will sleep 5 seconds and tell you “Time is up”:

timer 5

As a bonus, if you want minutes instead of seconds, you can always do something like this which will run the timer for 5 minutes:

timer `echo "5*60" | bc`

Replacing Unity with XFCE in Ubuntu

Here is what I do as soon as I install a new Ubuntu instance: I remove unity desktop and replace it with XFCE. And if you want to do the same it’s pretty straightforward. 😉

Perform all of these as root in a terminal window, or prepend with sudo. (Look elsewhere for GUI steps 🙂 )

  1. Update your repos:
    apt-get update
  2. Uninstall Unity and ubuntu-desktop:
    apt-get purge ubuntu-desktop unity-*
  3. Install XFCE Desktop environment:
    apt-get install xubuntu-desktop
  4. Restart lightdm:
    /etc/init.d/lightdm restart

Voilà! You’re using XFCE desktop! 😉