Tag Archives: tips

Mac OS X pkg files

PKG FilesSometimes you need to see what’s inside of that pkg file. But you also don’t want to install it. You just want to take a look at the files in it before installing it. Well, here is how to do it:

PKG files usually come in a DMG image. First mount that file by double clicking on it. Then open a Terminal window and go to the folder where it’s mounted. (Look under /Volumes)

Once you are in that folder you will see a file with a .pkg extension. Let’s say it is called Foo.pkg. Copy that file in a folder, I’ll copy it to /tmp.
cp Foo.pkg /tmp
cd /tmp

Mac OS X has a utility called pkgutil. You can do a ton of stuff with it, so check the manual page. (man pkgutil) But for our exercise we will just use it to expand the pkg file.
pkgutil --expand Foo.pkg /tmp/foo_package
cd /tmp/foo_package

This will open the pkg file to a flat structure. You will see some files and folders like Distribution, Resources, Foo.pkg. Go ahead and cd in the directory Foo.pkg:
cd Foo.pkg

In there you will several files. The important ones are Bom, Payload and PackageInfo:

Bom:

This file is called Bill of Materials. It describes what is in this pkg file and where they will be written to. If you will not do file/binary analysis of the contents of the pkg file and you want only to see which files will be written where, this is your file. You can also use this file’s contents to remove the package completely. (I leave this exercise up to you)

Bom is a binary file and there is a tool to list its contents: lsbom. (man lsbom for usage) Basic usage would be:
lsbom Bom

This will print file/directory structure of the contents on the screen.

Payload:

This is the file that contains all the files and directories in this pkg file. It’s a gzipped archive file.
$ file Payload
Payload: gzip compressed data, from Unix
$ mv Payload foo.gz
$ gunzip foo.gz
$ ls
foo

This will give you a file called foo. Now you need to use cpio to extract that archive.
$ cpio -iv < foo
.
./System
./System/Library
./usr
./System/Library/LaunchAgents
./usr/bin
......files files files.......
50002 blocks
$ ls
System foo usr

In my case it unarchived two folders called System and usr.

No you can go and browse these directory to find files you are looking for. Have fun 😉

Some basic statistics on leaked Sony usernames and passwords data.

I spent some time on analyzing password usage using the data that leaked from couple of Sony hacks few days ago. The results are pretty scary.

The data size: 38698 users on 2 sites.

Top ten most used passwords are:

  1. seinfeld
  2. password
  3. winner
  4. 123456
  5. purple
  6. sweeps
  7. contest
  8. princess
  9. maggie
  10. peanut

So if you have a password that is listed above, you better change it pretty soon.

I also compared how many people were using the same password on two different hacked Sony sites. There were 2421 users who used the same email to register and out of those only 168 users were using different passwords (about 6.5%).

And who wins the email war? Based on the same data, most of the users were using emails from the following providers:

# of users Provider
11281 yahoo.com
7250 other email providers
5077 hotmail.com
4876 aol.com
4837 gmail.com
1600 comcast.net
1263 msn.com
920 sbcglobal.net
676 verizon.net
478 bellsouth.net
440 cox.net

Airlink Ultra Mini USB Adapter with Linux

We recently bought this Ultra mini usb wifi adapter for our laptop that had it’s internal wifi card fried. Since this laptop was acting really bad with Windows XP, we installed Ubuntu on it.

At first Ubuntu couldn’t recognize the adapter. Then I wanted to try ndiswrapper. All I had to do was to install ndisgtk (sudo apt-get install ndisgtk). It installs ndiswrapper-utils package as a dependency. Then point the ndisgtk to the .inf file of the driver.  (net8192cu.inf)

Here is a more detailed write-up for generic ndiswrapper configuration from ubuntu.

The ID for this adapter is: 0bda:8176
When you run lsusb it shows as: Bus 001 Device 002: ID 0bda:8176 Realtek Semiconductor Corp.
The manufacturer id is: AWLL5088

Creating random files.

Here is a bash script to create 100 random files with random sizes smaller than 400KB. I needed this to quickly generate 100 files to use it on a stress test.

for ((i=1;i<101;i++)); do
size=`expr $RANDOM % 400`
dd if=/dev/urandom of=/tmp/testfile.$i bs=1024 count=$size
done

Explanation:

The for loop is pretty straightforward, it counts from 1 to 100.

size=`expr $RANDOM % 400`

This line generates a random number between 0 – 399

dd if=/dev/urandom of=/tmp/testfile.$i bs=1024 count=$size

This line generates a file with blocksize (bs / not bullsh!t) 1024 times the random number that we generated. The input for that file is the special urandom device in linux. (It’s the random number generator for the linux kernel)
The name of the file is also straightforward.

Lotus Notes 8.5 on Ubuntu 10.04

If you need to run native Linux client for Lotus Notes 8.5 on Ubuntu 10.04:

1) After installing your ibm_lotus_notes*.deb files, drop the following files under /opt/ibm/lotus/notes

libgdk-x11-2.0.so.0
libgtk-x11-2.0.so.0
libgdk_pixbuf_xlib-2.0.so.0
libgdk_pixbuf-2.0.so.0

You can get the files here.

2) Install msttcorefonts package: sudo apt-get install msttcorefonts

3) Go to File -> Preferences and choose Windows and Themes on the left pane. For Theme, choose Operating System Theme. This way most of the fonts in the UI look much better.

Gnome and the glslideshow screensaver setup.

First of all, setting up screensaver configurations in gnome is a total mess. I don’t know why they decided to release and use gnome-screensaver instead of using xscreensaver. And I don’t want to know either.

My ubuntu setup is an archaic one. It’s an upgrade over an upgrade over an upgrade. I probably upgraded 4 or 5 times. So my config files might be overwritten, wrongly upgraded, etc… But I was having this horrible issue of not being able to setup my glslideshow settings.

You can search this online. Mainly people are complaining about how to setup the directory from where glslideshow reads the images, also how to set it up so that it doesn’t idiotically show the same images 5 times over and over again. Well I’ll repeat these in this blog post and some more which are not covered.

Initial Setup:

First of all to setup the directory to read the images go to your home directory and create/edit file .xscreensaver like the one below:

imageDirectory: /home/username/Pictures/Slideshow/or/wherever

This sets up your screensavers that are using images, to use this directory instead of  /usr/share/backgrounds (the default directory). Some people on the internet tells you to symlink it to your directory, but I think this is a far better way of doing it.

If you read the glslideshow manual (RTFM), it tells you that by default glslideshow pans an image for 6 seconds (Ken Burns/Pan Scale effect) and displays it for 30 seconds. This means that the glslideshow will idiotically display the same image 5 times. (30/6=5)

In order to fix this issue, you will need to tell it to pan it n seconds and display it also n seconds. So the command should be:

/usr/lib/xscreensaver/glslideshow -root -pan 6 -duration 6

(-root means display on the root window which is the way screensavers work)

The configuration for this resides at: /usr/share/applications/screensavers/glslideshow.desktop

Go ahead and edit that file as root and change the line that reads:

Exec=/usr/lib/xscreensaver/glslideshow -root

to

Exec=/usr/lib/xscreensaver/glslideshow -root -pan 6 -duration 6

Now you are ready to have a slideshow that displays with pan/scale each image for 6 seconds.

And it all doesn’t work…

This is where the shit hit the fan for me. No matter what I did, my glslideshow was still running as /usr/lib/xscreensaver/glslideshow -root (ps aux | grep glslideshow)

After a stubborn and painful few hours I discovered that these settings were being cached in a file called: /usr/share/applications/desktop.en_US.utf8.cache (This is WTF number one)

If you look at this file, it’s a 56 KB cache file of all the settings gnome is reading for all of it’s applications!! I guess it should have been setup to delete it on restart but for some reason it never got deleted…

After renaming this file (never delete them, always rename them 🙂 ) the slideshow started to run as I wanted it to be.

WTF number two was that when I tried to add new images to my slideshow directory, glslideshow never picked them up. At the end of another painful search I found that the list of images are actually cached in a file called .xscreensaver-getimage.cache under /home/username/tmp/ (username is your username). I got rid of that file…

So now, it looks like I have a slideshow screensaver which kind of works. And hopefully you too…

Digital Frame or bust…

I’m writing this entry to push me to finish my neverending story about the digital frame project I started. I’m hoping that the entry will give me some sort of ignition after more than a year.

I had an old Dell Latitude c600 sitting at home and collecting dust. Like many other old hardware I have at home… So I decided to convert it to a digital frame that I can hang it somewhere.

Here are my goals:

  1. Have a low power, low cost digital frame.
  2. Ability to manage it wirelessly.
  3. Make it easy to use
  4. Have fun.
  5. Make an old hardware happy.

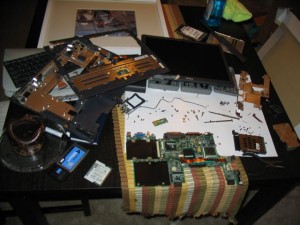
The very first step was to dissect the laptop and remove the guts. It turned out to be somewhat challenging, but with the right tools and time, things moved pretty good. I’m not going to go into details on how to dissect a c600, but here is a picture in the late stages of the dissection.

Guts and glory

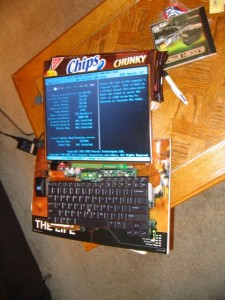
Next step was to remove all the unnecessary parts like battery, CD-ROM, and some mini pci cards like ethernet/modem combo. I kept the pcmcia slot for the wireless card, and while there, added some leftover RAM to it. After neatly placing them all together, here is how it looks with BIOS setup on. The image is tilted to get rid of the flash glare.

bios view

Now the software step. Of course my OS of choice is Debian/Linux. I installed bare minimum Debian with fluxbox as desktop manager. Al I needed to do was to find a low cpu/memory usage image viewer. At first I thought about not having a Graphic User interface, and use zgv from the console, but then I gave up since it was too much trouble. (Still I think it would be cool to have a console only picture frame, maybe on the next version)

Instead, I decided to use feh. I must say i’m extremely satisfied with feh and recommend to everybody 😉 The only issue I had was that the mouse pointer was showing in the middle of the frame which was not a good sight. I used unclutter to get rid of that. (I had to hack the program a bit to my taste)

I wrote some scripts and changed some config files for all this to start automatically. I will share the scripts later when the whole project is completed.

Now that the computer part is done, I need to take the measurements and head home depot or similar place to create some base for the frame and also buy a nice looking frame to place everything inside. So I guess there will be a second part of the blog entry.

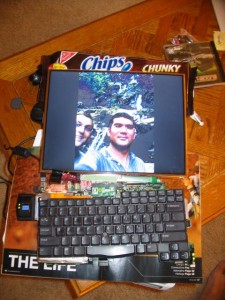
Here is how it looks like as of now:

Haris and me